
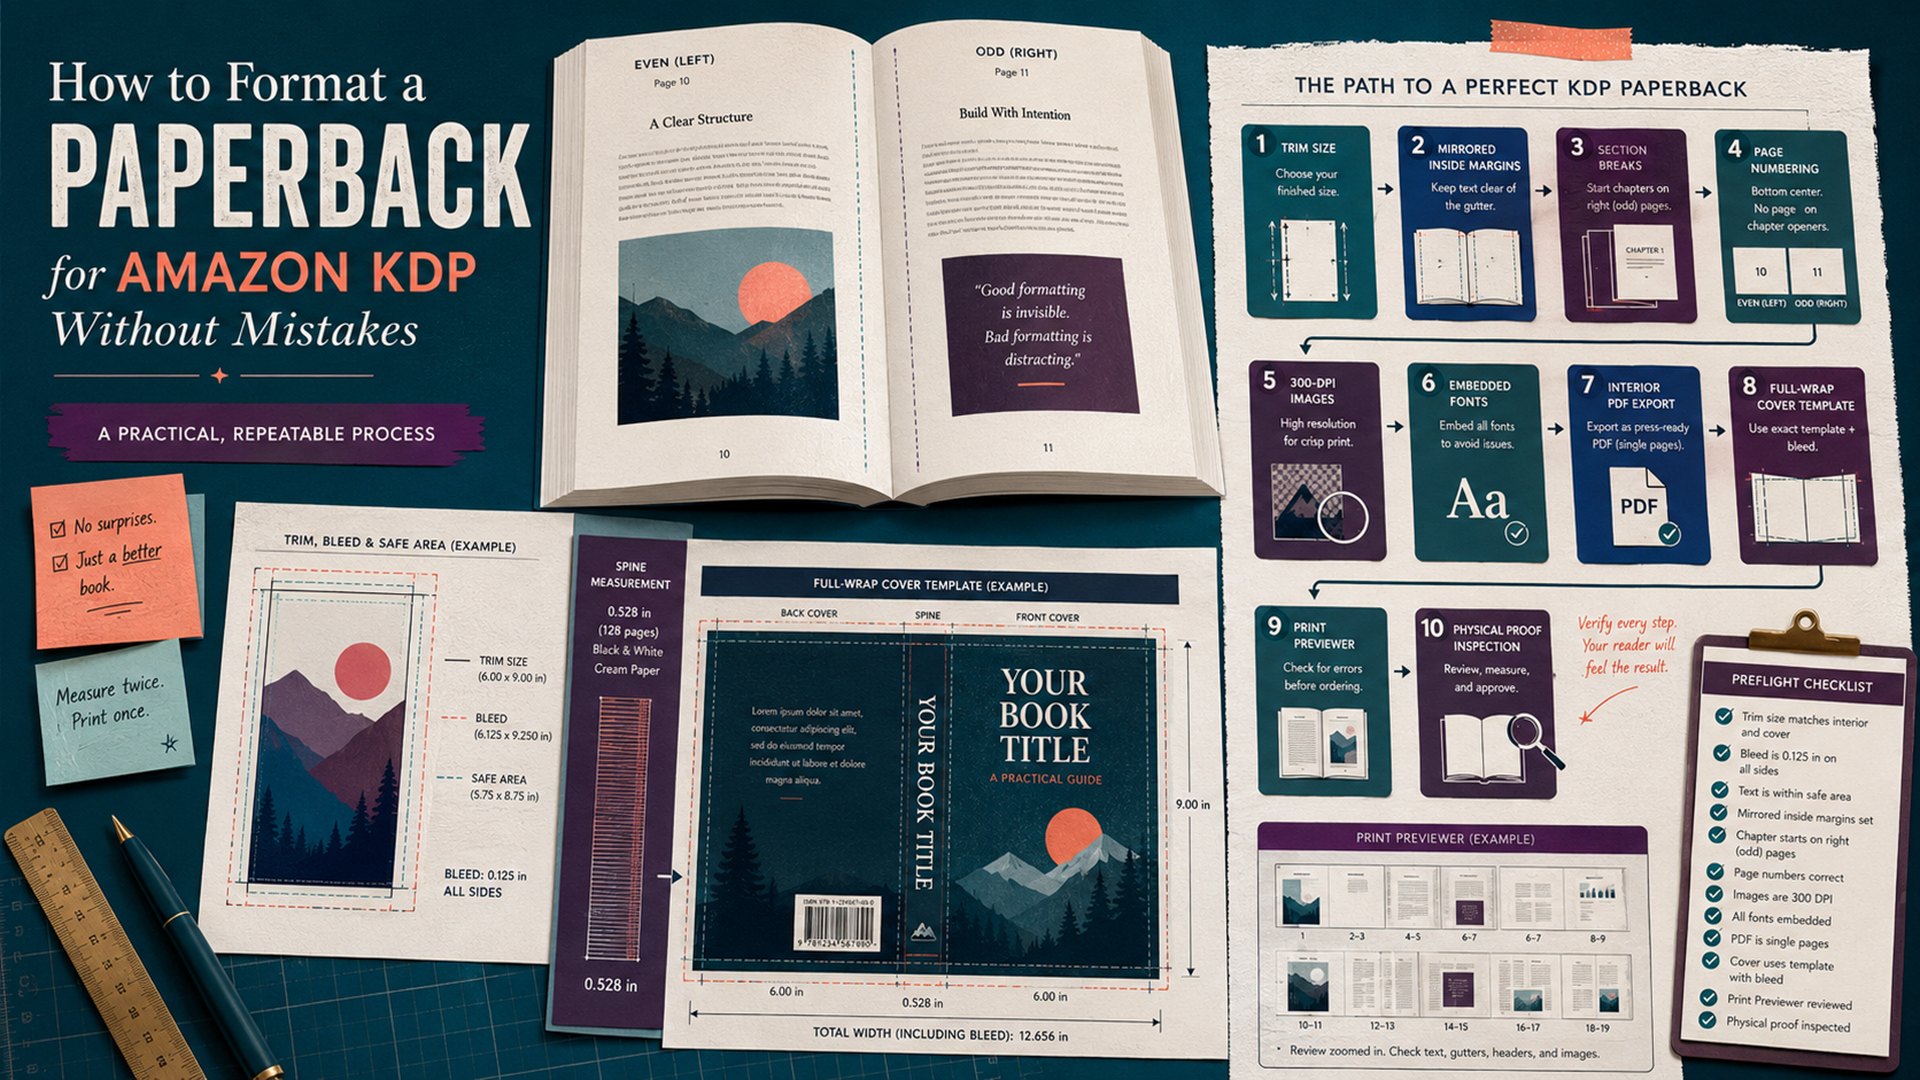
How do you format a paperback for Amazon KDP without mistakes? Make the printing decisions before you style the manuscript. Choose the trim size, ink and paper, and bleed setting first. Then set the exact page size, mirrored margins, section breaks, page numbers, images, and fonts. Export a print-ready PDF, generate the cover from the final page count, inspect every page in Print Previewer, and order a physical proof.
The most expensive formatting mistake is doing those steps out of order. If you change the trim size, font, margins, paper, or interior file late, the page count can change. That changes the spine width, which means the finished cover may no longer fit.
This guide uses a Microsoft Word–first workflow with Amazon’s official paperback manuscript templates. It also explains when Kindle Create is simpler and when a dedicated book-layout tool is safer.
The no-mistake KDP paperback workflow
- Finish editing the manuscript before layout.
- Choose the final trim size, ink, paper, and bleed setting.
- Download the matching KDP Word template.
- Set the page size and mirrored margins before styling chapters.
- Build the front matter, body, and back matter with section breaks.
- Apply paragraph and heading styles consistently.
- Add page numbers and running headers by section.
- Insert images at their final size and at least 300 DPI.
- Embed all fonts and export the interior as a print-ready PDF.
- Confirm the final PDF page count.
- Generate the full-wrap cover from Amazon’s cover calculator.
- Upload both files, review every page in Print Previewer, and fix the source files.
- Order a printed proof and inspect the physical book before publication.
The order matters: do not finalize the cover before the interior PDF is finished. A single font, margin, or paragraph-spacing change can move enough text to change the spine width.
A safe default setup for a text-heavy paperback
There is no universal layout for every genre, but this is a sensible starting configuration for a text-heavy novel, memoir, or standard nonfiction book.
| Setting | Safe starting choice | Why |
|---|---|---|
| Trim size | 6 × 9 inches | It is KDP’s default U.S. paperback size and works well for general nonfiction and many novels. |
| Bleed | No bleed | Use no bleed unless an image, background, rule, or graphic intentionally reaches a page edge. |
| Interior | Black ink | Best for text-heavy interiors unless color is essential to the reader experience. |
| Paper | Cream for many novels; white for many nonfiction books, workbooks, and books with graphics | This is a design choice. Compare physical books in your category before deciding. |
| Body type | Readable serif font around 10–12 points | KDP’s 7-point minimum is a production floor, not a comfortable design target. |
| Paragraphs | First-line indent for narrative text; consistent spacing for nonfiction | Avoid using tabs, repeated spaces, or blank lines to fake paragraph formatting. |
| Margins | Mirror margins; inside margin based on final page count | The inside margin must grow as the book becomes thicker. |
| Interior file | Print-ready PDF | A PDF preserves the layout and is required when the interior uses bleed. |
| Cover file | One full-wrap PDF generated from the final page count | The cover must include the back, spine, and front in a single correctly sized file. |
Choose the formatting workflow before editing the layout
The best workflow depends on how complicated the interior is.
| Workflow | Best for | Main advantage | Main risk |
|---|---|---|---|
| Microsoft Word + KDP template | Novels, memoirs, essays, and standard nonfiction | Accessible, inexpensive, and controllable when styles and section breaks are used properly. | Manual page breaks, local formatting, and bad section settings can create hidden errors. |
| Kindle Create | Text-heavy books with simple layouts | Amazon-supported themes, chapter detection, front/back matter tools, and KPF export. | KDP does not recommend its print workflow for interiors relying on editable tables, footnotes, or bleed. |
| Atticus | Authors who want a dedicated cross-platform writing and book-formatting tool | Imports manuscripts and exports print PDFs and digital book files from one project. | You still need to verify KDP trim, bleed, image, and cover requirements. |
| Vellum | Mac users producing polished fiction and text-heavy nonfiction | Automates print margins, page numbers, headers, and book-specific styling. | It is available only on macOS and is a paid tool. |
| Adobe InDesign | Children’s books, art books, complex workbooks, textbooks, and image-heavy layouts | Professional control over master pages, image placement, typography, bleed, and print export. | It has the steepest learning curve and makes it easier to create technically precise but visually poor pages. |
| Google Docs | Drafting and collaboration | Easy sharing and revision. | Long-document pagination, mirrored margins, sections, headers, and print export are easier to disrupt. |
| Canva | Short visual interiors and cover concepts | Fast visual design. | It is easy to produce inconsistent page sizes, weak typography, low-resolution graphics, and difficult long-document revisions. |
For a first text-heavy paperback, Word plus Amazon’s template is the most transparent workflow. For a book with full-page photographs, complex tables, repeated workbook elements, or carefully controlled visual spreads, use software designed for page layout.
Lock the print options before formatting
Open the KDP paperback setup and decide the print configuration before building the interior. KDP’s current Print Options include choices for ink, paper, trim size, bleed, and cover finish.
Write the choices at the top of your project notes:
Binding: Paperback
Reading direction: Left to right
Trim size: 6 × 9 inches
Interior: Black ink
Paper: Cream
Bleed: No bleed
Cover finish: Matte
The interior PDF, KDP setup, and cover calculator must all use the same choices. A mismatch between any of them can create margin, cover-size, or preview errors.
Color warning: if any interior artwork must print in color, choose a color interior. Black-ink printing will not preserve color simply because the source PDF contains it.
Choose the paperback trim size
Trim size is the final width and height of the printed page after manufacturing. Amazon identifies 6 × 9 inches as the most common U.S. trim size and uses it as the default paperback size, but the best size depends on the category and reading experience.
| Trim size | Often used for | Layout effect |
|---|---|---|
| 5 × 8 inches | Compact fiction, poetry, short memoirs | More pages and a thicker spine for the same word count. |
| 5.25 × 8 or 5.5 × 8.5 inches | Trade fiction, memoir, narrative nonfiction | Feels book-like without being as compact as 5 × 8. |
| 6 × 9 inches | General nonfiction, business books, manuals, many novels | Fits more text per page and is easy to set up with KDP templates. |
| 7 × 10 inches | Workbooks, educational books, technical guides | Provides more room for tables, exercises, and diagrams. |
| 8 × 10 or 8.5 × 11 inches | Workbooks, textbooks, activity books, image-heavy nonfiction | Provides writing and image space but can feel oversized for continuous reading. |
| Square formats | Children’s books, visual books, selected journals | Requires a layout and cover designed specifically for the square page. |
Choose the size by examining successful books in the same category. Once chosen, set the Word page size before styling, because changing it later alters line breaks, page breaks, page count, gutter requirements, and spine width.
Bleed vs. no bleed
Bleed is needed when a background, photograph, illustration, rule, or other object must reach the physical edge of the printed page. The object extends beyond the trim line so normal cutting variation does not leave a white strip.
For a standard left-to-right paperback interior, KDP trims 0.125 inch from the top, bottom, and outside edge. That means the page file becomes wider and taller, but no bleed is added at the binding edge.
| Interior type | PDF page size | Example for 6 × 9 |
|---|---|---|
| No bleed | Exactly the selected trim size | 6 × 9 inches |
| With bleed | Trim width + 0.125 inch; trim height + 0.25 inch | 6.125 × 9.25 inches |
Bleed page width  = trim width + 0.125 inch
Bleed page height = trim height + 0.25 inch

Example:
6 × 9 trim → 6.125 × 9.25 PDF page
Choose bleed only when needed. A text-only book does not benefit from bleed. If the book uses bleed, the manuscript must be uploaded as a PDF, and every object intended to touch an edge must extend fully through the bleed area.
Do not place page numbers, captions, headings, or important image details in the bleed zone. Bleed is sacrificial artwork, not a safe content area.
Set mirrored margins and the correct inside margin
Paperback pages alternate between left-facing and right-facing pages. Use mirrored margins so the binding-side margin switches sides automatically.
KDP’s minimum inside margin increases with the number of pages because a thicker book needs more space near the binding.
| Final page count | Minimum inside margin | Minimum outside margin without bleed | Minimum outside margin with bleed |
|---|---|---|---|
| 24–150 pages | 0.375 inch | 0.25 inch | 0.375 inch |
| 151–300 pages | 0.5 inch | 0.25 inch | 0.375 inch |
| 301–500 pages | 0.625 inch | 0.25 inch | 0.375 inch |
| 501–700 pages | 0.75 inch | 0.25 inch | 0.375 inch |
| 701–828 pages | 0.875 inch | 0.25 inch | 0.375 inch |
Those are minimums, not automatic design recommendations. A book can technically pass KDP and still feel cramped. Use larger outside, top, and bottom margins when the category and page count allow it.
Word margin setup
- Open Layout → Margins → Custom Margins.
- Choose Mirror margins under Multiple pages.
- Apply the setting to the whole document.
- Enter the inside margin required for the final page count.
- Enter the outside, top, and bottom margins.
- In Word, leave the separate Gutter field at zero and place the required binding allowance in the Inside field.
KDP’s Word walkthrough suggests generous top and bottom margins when running headers are used. Do not push headers, footers, or body text against the production minimum merely to remove a few pages.
Recheck after export: changing the font, trim size, line spacing, or paragraph spacing can change the page count. If the book moves into a new page-count band, increase the inside margin and export again.
Set up the manuscript with Amazon’s Word template
Amazon provides blank templates and templates with sample content for supported trim sizes. The blank version includes the page size and margins. The sample-content version also includes formatted front matter and chapters.
- Download the template matching the language and final trim size.
- Save a working copy under a new filename.
- Turn on Word’s Show/Hide formatting marks.
- Delete every sample paragraph, placeholder heading, and template instruction you do not need.
- Paste the manuscript as unformatted text or use Paste and Match Formatting.
- Apply Word styles instead of formatting each paragraph manually.
- Inspect the document in the Navigation pane and page view.
Remaining template text is a common submission error. Search the document for obvious placeholders such as “Chapter 1,” “Book Title,” “Author Name,” and sample copyright language before export.
Create a small style system
| Word style | Use | Control centrally |
|---|---|---|
| Normal or Body | Main text | Font, size, line spacing, first-line indent, paragraph spacing, justification. |
| Heading 1 | Chapter or major section titles | Typeface, size, spacing, alignment, page-break behavior. |
| Heading 2 | Subheadings in nonfiction | Hierarchy, spacing, keep-with-next behavior. |
| First Paragraph | First paragraph after a chapter title or major break | No first-line indent; optional drop cap or lead-in treatment. |
| Block Quote | Long quotations, letters, extracts | Left/right indent, spacing, optional smaller type. |
| Caption | Figures, photographs, tables | Size, alignment, spacing, numbering. |
When a style changes, every paragraph using it updates. That is the difference between a manageable book file and hundreds of manually formatted exceptions.
Build the front matter with real section breaks
Front matter appears before the main text. Not every book needs every element, but KDP lists a conventional order:
- Half title
- Title page
- Copyright page
- Reviews or praise
- Dedication
- Table of contents
- Preface
- Acknowledgments
- Prologue
- Introduction
A simple novel might use only a title page, copyright page, dedication, optional contents page, and the story. A nonfiction book may need a contents page, preface, acknowledgments, and introduction.
Use section breaks—not repeated blank lines
Use Layout → Breaks → Next Page to separate front matter from the body and to create independent chapter or part sections. Section breaks let you control page-number styles, headers, footers, and chapter opening pages without affecting the whole file.
Right-facing pages are odd-numbered pages. Chapter 1 traditionally begins on a right-facing page. Later chapters may begin on the next available page unless the book’s design intentionally starts every chapter on the right.
| Break type | Use it for | Possible problem |
|---|---|---|
| Next Page section break | Front matter, chapters, parts, back matter | Starts the new section on the next page, whether left or right. |
| Odd Page section break | A design that requires a section to begin on a right-facing page | Word may insert an intentional blank even page, which can look unexpected in the PDF. |
| Page break | A simple new page within one section | Does not create independent header, footer, or numbering controls. |
| Repeated Enter presses | Nothing | Text moves unpredictably whenever pagination changes. |
If every chapter must start on an odd page, use Odd Page section breaks intentionally and verify each inserted blank page. Do not delete a necessary blank simply because it looks empty on screen.
Format chapter openings and body text consistently
Book typography should disappear while the reader focuses on the content. The most common problem is not an obviously ugly font. It is inconsistent spacing, indents, headings, and chapter openings.
Body text
- Use one primary body typeface.
- Use a readable size, usually around 10–12 points depending on the typeface and trim size.
- Use paragraph settings, not tabs or spaces, for first-line indents.
- Avoid adding a blank line between every paragraph in conventional narrative books.
- For practical nonfiction, either indents or paragraph spacing can work, but use one system consistently.
- Keep line spacing comfortable without making the book look like a school paper.
- Control widows and orphans carefully, but do not introduce large white gaps to remove every one.
Chapter openings
- Apply Heading 1 to every chapter title.
- Use consistent spacing before and after the chapter title.
- Remove the first-line indent from the first paragraph after the heading.
- Suppress running headers on chapter-opening pages.
- Use drop caps or ornaments only if they fit the genre and reproduce cleanly.
Nonfiction headings
Use Heading 1, Heading 2, and Heading 3 in a logical hierarchy. Avoid a heading stranded at the bottom of a page. Word’s Keep with next setting can keep a heading attached to the first paragraph that follows it.
Set page numbers and running headers by section
Page numbering is where section-break mistakes become visible. Front matter may use lowercase Roman numerals, while the main text usually begins with Arabic page 1. Many novels omit visible front-matter numbers entirely while still counting the pages internally.
A reliable Word setup
- Create a section break between the front matter and Chapter 1.
- Open the footer on the first page of Chapter 1.
- Turn off Link to Previous.
- Insert the page number.
- Choose Format Page Numbers and start the body at 1.
- If using Roman numerals in the front matter, format that section separately.
- Use Different First Page to hide numbers or headers on title and chapter-opening pages.
- Use Different Odd & Even Pages when running headers differ by side.
For left-to-right books, odd page numbers belong on right-facing pages and even numbers on left-facing pages. KDP requires sequential pagination and can flag inconsistent numbering.
Running headers
A common design places the author’s name on left pages and the book title on right pages. Nonfiction may use chapter titles instead. Do not use running headers on the half title, title page, copyright page, table of contents opening, part pages, or chapter-opening pages.
Blank-page warning: Word can insert blank pages when an Odd Page section break follows an odd-numbered page. Turn on formatting marks and inspect the exported PDF before assuming the page is accidental.
Format images, tables, workbooks, and full-bleed pages
Images
KDP recommends images at a minimum of 300 DPI at their final printed size. A 1200 × 1800-pixel image printed at 4 × 6 inches is 300 DPI. Changing an image’s metadata to “300 DPI” does not create missing pixels.
- Insert the original image file; do not copy and paste from a web page.
- Size the image before placing it into Word.
- Do not enlarge a small image after insertion.
- Turn off Word’s automatic image compression.
- Flatten transparency and layered artwork before final export.
- Use color interior printing when the images must reproduce in color.
- Keep captions and important image details inside the safe margins.
KDP identifies images below 200 DPI as low resolution and recommends at least 300 DPI. It also recommends avoiding unnecessarily extreme resolutions; approximately 600 DPI is a practical upper target for many source images because oversized files can slow processing.
Turn off Word image compression
- Open File → Options → Advanced.
- Find Image Size and Quality.
- Select Do not compress images in file.
- Choose the current document or apply the setting globally.
Tables and charts
Simple tables can work in Word, but inspect every page after PDF conversion. Do not let tables cross the inside margin or split in unreadable places. KDP recommends lines at least 0.75 point thick for charts, tables, and other line-based graphics.
For wide tables, consider one of these options:
- rewrite the table into two smaller tables
- use a larger trim size
- use landscape-oriented content only with a carefully designed layout
- move detailed data to an appendix or companion download
- use InDesign when the table structure is too complex for Word
Workbooks
Workbooks need more than KDP’s minimum margin. Give readers physical writing room, especially near the binding. Test actual pen use in the proof copy. A line that looks spacious on a monitor may feel cramped when the book is held open.
Children’s and image-heavy books
Use full bleed only when the design requires it. Keep faces, text, and important artwork away from trim and fold uncertainty. Image-heavy books usually benefit from dedicated page-layout software, because every spread must be checked visually rather than allowed to reflow.
Choose fonts that can be embedded and printed
KDP requires fonts to be embedded in both the interior and cover files. Use fonts that allow commercial print use and embedding. A font that looks correct on your computer may be substituted or rejected if the font data cannot be embedded.
Embed fonts in Word
- Open File → Options → Save.
- Select Embed fonts in the file.
- Leave Embed only the characters used unchecked.
- Leave Do not embed common system fonts unchecked.
- Save the working file before exporting the PDF.
Check the final PDF in a PDF viewer under File → Properties → Fonts. Every used font should show as embedded. KDP recommends full embedding rather than subset embedding when possible.
| Font issue | Likely cause | Fix |
|---|---|---|
| Font is not embedded | Word embedding was disabled or the font license blocks embedding. | Enable embedding or replace the font. |
| Bold or italic rejected | The software created a faux style rather than using a real bold or italic font file. | Install and select the actual font family member. |
| Unexpected line breaks | The PDF substituted the font or used different font metrics. | Embed the correct font and export again. |
| Font error remains after visible text is changed | The rejected font may remain in headers, line breaks, punctuation, tables, or unused style definitions. | Inspect styles and hidden formatting, then replace the font throughout the document. |
Export a print-ready manuscript PDF
KDP prefers PDF for paperbacks, and PDF is required for a bleed interior. A print-ready PDF freezes page dimensions, line breaks, images, and typography more reliably than uploading a live Word file.
Before exporting
- Turn on Word’s formatting marks.
- Inspect section breaks and manual page breaks.
- Update the table of contents.
- Update cross-references and figure numbers.
- Run spelling and grammar checks.
- Search for placeholder text.
- Confirm image compression is disabled.
- Confirm fonts are set to embed.
PDF export settings
When Adobe PDF is available, Amazon’s Word-to-PDF guidance recommends PDF/X-1a or, if unavailable, a High Quality Print or Press Quality preset. If using Word’s built-in PDF export, inspect the output carefully rather than assuming the conversion preserved everything.
The finished interior PDF should meet these checks:
| PDF check | Requirement |
|---|---|
| Page size | Every page matches the exact no-bleed or bleed dimensions. |
| Page format | Single pages, not reader spreads or two-up pages. |
| Fonts | All fonts are embedded. |
| Images | At least 300 DPI at final size, embedded, and flattened. |
| File size | No more than 650 MB. |
| Security | No password, encryption, or editing lock. |
| Printer marks | No crop marks, trim marks, registration marks, or color bars. |
| Annotations | No comments, bookmarks, visible review marks, placeholders, or PDF-creator watermarks. |
| Pagination | Sequential and correctly positioned on left/right pages. |
Open the exported PDF and inspect it at actual size. Check the PDF properties for page dimensions and embedded fonts. Then scroll through it as pages—not as continuous draft text.
Create the full-wrap paperback cover after pagination is final
A paperback cover is not a front-cover image. It is one continuous PDF containing the back cover, spine, and front cover.
Wait until the final interior PDF is complete. Then use Amazon’s Print Cover Calculator and Template Generator.
- Select Paperback.
- Select the exact interior type.
- Select the exact paper type.
- Select the reading direction.
- Select the exact trim size.
- Enter the page count of the final formatted PDF.
- Download the PDF or PNG cover template.
- Place the template as a locked guide layer in the design file.
- Export one print-ready cover PDF with the guide layer hidden.
Full-cover size formula
Cover width =
0.125 bleed
+ back cover width
+ spine width
+ front cover width
+ 0.125 bleed

Cover height =
0.125 bleed
+ trim height
+ 0.125 bleed
The cover calculator is safer than calculating the spine manually because the spine depends on page count, ink, and paper. KDP’s published spine factors currently differ for white, cream, groundwood, and color paper.
| Cover requirement | What to do |
|---|---|
| File structure | Upload one PDF containing back, spine, and front. |
| Cover bleed | Extend backgrounds 0.125 inch beyond every outer edge. |
| Outer safe area | Keep content not intended for trimming at least 0.25 inch from the outside cover edge. |
| Spine text | Use only when the final book has at least 80 pages. |
| Spine safety | Keep spine text at least 0.0625 inch from each spine edge. |
| Barcode | Leave the template’s barcode area clear if Amazon will add the barcode. |
| Images | Use high-resolution, flattened artwork. |
| Fonts | Embed all cover fonts and avoid faux bold or italic styles. |
Do not resize an old cover by stretching it to a new template. If the page count changes, reposition the spine, fold-sensitive elements, back-cover copy, and barcode area in the editable source file.
Upload the files and inspect Print Previewer
In KDP, choose the same ink, paper, trim, and bleed settings used to create the files. Upload the manuscript, upload or build the cover, and launch Print Previewer.
Print Previewer checks issues such as margins, cover size, and fonts. It may attempt to scale or reflow some content, but an automatic adjustment is not a substitute for fixing the original document.
Review every interior page
- Confirm the first printed page appears on the correct side.
- Check all intentional and unintentional blank pages.
- Confirm Chapter 1 begins on a right-facing page.
- Check the position of every later chapter opening.
- Verify odd/even page numbers.
- Check running headers and their suppression on opening pages.
- Inspect tables, captions, footnotes, and callout boxes.
- Zoom into every image.
- Check that bleed artwork crosses the trim line.
- Confirm no live text crosses the margin boundaries.
- Look for sudden font, spacing, or line-break changes.
Review the cover
- Confirm the title is present on the front cover.
- Check spine centering and reading direction.
- Make sure no spine text crosses the spine safe area.
- Check back-cover copy against the fold and barcode zones.
- Confirm all backgrounds extend through bleed.
- Check that no template guides appear in the exported file.
Do not approve a file you have not reviewed page by page. A green preview status does not guarantee that the typography, blank pages, chapter starts, image quality, and cover alignment are aesthetically correct.
Order and inspect a physical proof copy
A screen cannot show binding tightness, paper show-through, real image contrast, cover color, text size, or whether the book feels comfortable to hold. Order a printed proof before publication.
KDP allows proof copies while the book is in Draft status after the book is approved in Print Previewer. You can request up to five proofs per order. Proofs include a “Not for Resale” watermark and a unique barcode without the book’s ISBN.
Inspect the physical book in this order
| Area | What to inspect |
|---|---|
| Cover | Color, finish, trim, front alignment, spine centering, fold position, back-cover copy, barcode zone. |
| Binding | Whether text feels too close to the spine and whether the book opens comfortably. |
| Body text | Font size, line spacing, darkness, paragraph indent, justification, widows, and awkward word spacing. |
| Page architecture | Recto/verso position, blank pages, chapter starts, part pages, page numbers, headers, and footers. |
| Images | Sharpness, grayscale conversion, color, crop, bleed, caption placement, and contrast. |
| Tables and workbook pages | Legibility, line thickness, writing room, binding clearance, and page-break behavior. |
| Paper choice | Readability, opacity, contrast, tactile feel, and suitability for the category. |
Read at least several consecutive pages rather than flipping randomly. Continuous reading reveals tight leading, weak margins, distracting headers, and uncomfortable type more reliably than spot checks.
Common KDP formatting errors and how to fix them
| Error | Likely cause | Fix |
|---|---|---|
| Wrong trim size | The Word page or exported PDF does not match the KDP selection. | Set the correct page size in the source file, repaginate, and export a new PDF. |
| White border on a bleed page | The page size or artwork does not extend far enough past the trim line. | Use the bleed page dimensions and extend artwork 0.125 inch beyond the top, bottom, and outside edges. |
| Margin or gutter warning | The inside margin is too small for the page count, or content crosses the safe area. | Use mirror margins, increase the inside margin, and reposition content. |
| Extra blank pages | Odd Page breaks, duplicated breaks, hidden paragraphs, or Word pagination rules. | Show formatting marks and inspect section/page breaks rather than deleting pages blindly. |
| Chapter starts on the wrong side | Wrong break type or a deleted intentional blank page. | Use an Odd Page section break only where a recto opening is required. |
| Page numbers restart or repeat | Sections remain linked or numbering is configured inconsistently. | Unlink the section footer and set the correct Start at or Continue settings. |
| Header appears on chapter opener | Different First Page is disabled or the section is linked incorrectly. | Enable Different First Page and verify each chapter section. |
| Low-resolution image warning | The image has too few pixels at its printed dimensions. | Replace it with a higher-resolution source or print it smaller. |
| Image disappeared during PDF export | Word print settings, unsupported transparency, or third-party PDF conversion. | Flatten the image, enable printing of drawings/backgrounds, and use a reliable print-PDF workflow. |
| Unembedded or rejected font | Embedding is disabled, the license blocks embedding, or a faux style is used. | Fully embed the font or replace it with an embeddable family. |
| Cover rejected | Wrong page count, wrong paper selection, bad spine width, missing bleed, or invalid spine text. | Regenerate the official cover template using the final interior settings. |
| Spine text rejected | The book has fewer than 80 pages or text falls outside the spine safe area. | Remove the spine text or increase the book naturally—never add meaningless pages solely for a spine title. |
| Template text remains | Sample content was not fully deleted. | Search the source document and inspect every page before exporting. |
| PDF watermark or logo appears | A free or third-party PDF converter added branding. | Export through Word, Adobe PDF, or another professional unbranded PDF workflow. |
Professional KDP paperback preflight checklist
Print setup
- Trim size matches the KDP paperback setup.
- Ink and paper choices are final.
- Bleed is selected only when the interior requires it.
- The PDF page size includes bleed correctly when applicable.
Margins and page architecture
- Mirror margins are enabled.
- The inside margin matches the final page-count band.
- Top, bottom, and outside margins exceed KDP minimums where appropriate.
- Front matter, body, and back matter use deliberate section breaks.
- Chapter 1 begins on a right-facing page.
- Later chapter starts follow one intentional design rule.
- Every blank page is intentional.
Typography
- Body type is readable at printed size.
- Paragraph indents and spacing are controlled by styles.
- The first paragraph after a chapter heading is formatted intentionally.
- Headings are not stranded at page bottoms.
- No faux bold or italic fonts are used.
- All fonts allow commercial print use and embedding.
Headers and pagination
- Odd numbers appear on right pages and even numbers on left pages.
- The body begins at the intended page number.
- Roman numeral front matter is configured consistently if used.
- Running headers are correct on odd and even pages.
- Headers and visible page numbers are suppressed where intended.
Images and tables
- Images are at least 300 DPI at final print size.
- Word image compression is disabled.
- No image has been enlarged beyond its useful resolution.
- All transparency and layers are flattened.
- Bleed artwork crosses the trim line fully.
- Tables remain inside the margins and are readable.
- Lines are thick enough to reproduce cleanly.
Interior PDF
- All pages have identical dimensions.
- The file contains single pages rather than spreads.
- All fonts are embedded.
- The file is under 650 MB.
- No crop marks, comments, placeholders, or watermarks remain.
- The PDF is not encrypted or password protected.
- The final page count has been recorded for the cover.
Cover
- The template was generated from the final page count and exact print settings.
- The cover is one continuous PDF.
- Background artwork extends through all cover bleed edges.
- Text stays inside the safe areas.
- Spine text is used only for a book of at least 80 pages.
- The barcode zone is clear when Amazon will add the barcode.
- The template guide layer is hidden before export.
Final quality control
- Every page has been reviewed in Print Previewer.
- Every warning has been understood rather than ignored automatically.
- The physical proof has been inspected in normal reading light.
- Corrections were made in the editable source files.
- The corrected PDF and cover were uploaded and previewed again.
When to use Kindle Create, Atticus, Vellum, or InDesign instead
Word is not automatically the best tool simply because the manuscript was written in Word.
| Your book | Better starting tool | Reason |
|---|---|---|
| Simple novel or memoir | Word, Kindle Create, Atticus, or Vellum | The layout is mostly continuous text and chapter openings. |
| Text-heavy nonfiction with simple headings | Word, Atticus, Vellum, or Kindle Create | The main needs are heading hierarchy, contents, pages, and consistent body text. |
| Nonfiction with many tables or footnotes | Word, Atticus, or InDesign | Kindle Create cannot directly edit imported tables, lists, footnotes, and some inline elements. |
| Workbook with repeated layouts | InDesign or another page-layout application | Master pages and precise object placement reduce inconsistency. |
| Children’s or image-heavy book | InDesign or another professional fixed-page layout tool | Every image, bleed edge, caption, and spread needs controlled positioning. |
| Short visual journal or activity book | Canva or page-layout software, with strict preflight | Canva may be workable for simple pages, but the exported PDF still has to meet every KDP requirement. |
Regardless of software, KDP evaluates the exported files—not how easy the design program felt to use. Always verify page size, bleed, margins, fonts, images, cover dimensions, and physical output.
FAQ
What is the easiest way to format a paperback for KDP?
For a text-heavy book, use Microsoft Word with Amazon’s manuscript template or use Kindle Create for a simple layout. Set the trim size and margins before styling, then export a PDF and review it in Print Previewer.
What page size should I use for a 6 × 9 KDP paperback?
For no bleed, use exactly 6 × 9 inches. For bleed, use 6.125 × 9.25 inches because KDP adds 0.125 inch to the outside width and 0.125 inch to both the top and bottom.
Do I need bleed for a normal novel?
Usually not. A text-only novel normally uses no bleed. Choose bleed only when artwork, backgrounds, rules, or other objects must reach a page edge.
What margins should I use for KDP?
Use mirrored margins. KDP’s minimum inside margin ranges from 0.375 inch for books up to 150 pages to 0.875 inch for books over 700 pages. The minimum outside margin is 0.25 inch without bleed and 0.375 inch with bleed.
Should I add a separate gutter in Microsoft Word?
In KDP’s Word workflow, put the required binding allowance in the Inside margin and leave Word’s separate Gutter field at zero. Select Mirror margins so the inside edge alternates correctly.
Does KDP require a PDF manuscript?
A PDF is required for an interior with bleed and is the safer format for fixed print layout. KDP accepts several other formats for no-bleed books, but those files are converted before printing.
How do I calculate the KDP cover size?
Finish the interior first, record its final page count, and enter the binding, ink, paper, trim size, reading direction, and page count into Amazon’s Print Cover Calculator. Download the generated PDF or PNG template.
Can I put text on the paperback spine?
Only use spine text when the final paperback contains at least 80 pages. Keep the text inside the spine safe area and at least 0.0625 inch from each spine edge.
What image resolution does KDP require?
KDP recommends images at a minimum of 300 DPI at their final printed dimensions. Resizing a small image or changing its DPI label does not add real image detail.
Should I order a proof before publishing?
Yes. Print Previewer catches file and layout issues, but only a physical proof reveals binding clearance, real text size, paper show-through, image contrast, cover alignment, and how the book feels in hand.
Official KDP sources and useful links
- Amazon KDP: Format Your Paperback
- Amazon KDP: Format a Paperback Manuscript in Word for Windows
- Amazon KDP: Paperback and Hardcover Manuscript Templates
- Amazon KDP: Set Trim Size, Bleed, and Margins
- Amazon KDP: Format Front Matter, Body Matter, and Back Matter
- Amazon KDP: Format Images in Your Book
- Amazon KDP: Paperback Fonts
- Amazon KDP: Save Your Manuscript File
- Amazon KDP: Convert a Paperback Word File to PDF
- Amazon KDP: Create a Paperback Cover
- Amazon KDP: Print Cover Calculator and Templates
- Amazon KDP: Paperback Submission Guidelines
- Amazon KDP: Fix Paperback and Hardcover Formatting Issues
- Amazon KDP: Upload and Preview Book Content
- Amazon KDP: Order a Proof or Author Copy
- Amazon KDP: Prepare Reflowable and Print Books With Kindle Create
A clean KDP paperback is built in sequence: lock the print configuration, format the interior, export and inspect the PDF, generate the cover from the final page count, review the digital preview, and then inspect a physical proof. Skipping that sequence is what turns a small formatting change into a rejected cover or a book that technically prints but does not look professionally designed.